You might also like…


Between heavy foot traffic, sporadic weather, and local pests, your backyard deck, no doubt, takes a serious beating throughout the year. Even the most durable decking products can use a little sprucing up before summer officially arrives.
Deck waterproofing is essential to keeping your backyard deck safe, functional, and stylish for years to come. If you’re going the DIY route and installing your own deck, it’s critical that you learn how to seal it prior to cutting the wood. This is because the wood must be sealed within 24 hours for the best results.
If you simply need to re-seal your deck, the same steps will apply. Follow this step-by-step guide to ensure that your deck remains as beautiful and functional as the day it was installed.
Waterproof Sealing a Deck in 6 Steps
1. Clear Away Deck Debris
Before you can apply your sealant, your deck must be dry and clean. Start by using a long-handle deck broom to sweep away all the dirt, leaves, and pine needles. Gather up the dust and debris into a receptacle so that it doesn’t blow back onto your deck.
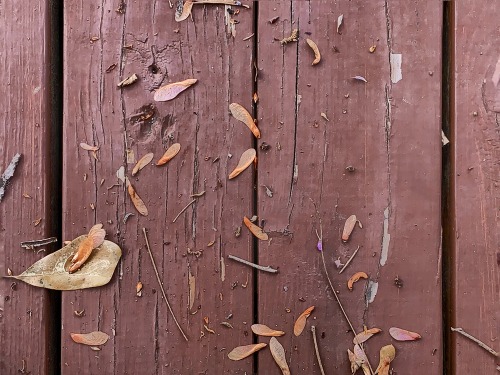
As you sweep, pay close attention to the condition of your deck. Make note of any cracks, protruding nails, and other signs of damage. You’ll need to repair these common deck issues before any deck waterproofing.
2. Repair Wood
After dirt and debris have been cleared away, go back to the damaged spots you noted earlier and begin making repairs to any cracks, splitting, and protruding nails. Nails that have been pushed upward can be hammered back in using a hammer and a drift pin to avoid damaging or denting the board. If you see any nails that are broken, be sure to replace them.
Keep an eye out for rotted boards, which can be an issue in composite or wood decking. You can usually replace a single board with ease, and, given enough time, it will eventually blend in with the rest of your deck.
3. Deep Clean Your Backyard Deck
If your backyard deck still looks a bit worse for wear after your first cleaning, you may need to deep clean it. Although power washers are an effective way to deep clean your deck, be aware that they can also damage softer woods such as cedar or pine.
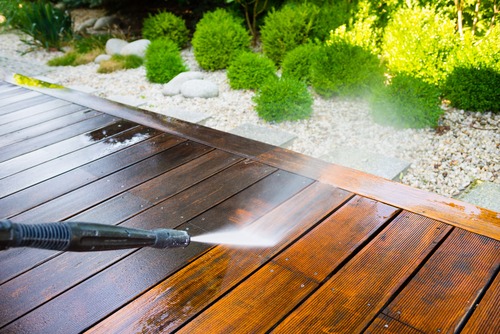
When using a power washer on a soft wood deck, opt for a lower water pressure setting (600-750 psi) to avoid etching or splintering. Hold the power washer a foot away from the deck. If the stains don’t come out, use a formulated deck cleaner and a synthetic bristle brush to scrub any remaining spots as best you can.
4. Wait for Your Deck to Dry
Before you can move on to the next step, it’s important that you give your deck at least three days to dry completely. This will ensure that the sealant is applied properly and that it adheres to the wood.
Check the forecast to see if it’s going to rain. If it rains, you’ll need to hold off on sealing your deck again until the wood is fully dry. Keep in mind that you may need to wait longer if your deck is in shadows for most of the day.
5. Choose Your Sealant
Selecting the right sealant for your deck can be tricky because it depends on the climate and the type of decking material. Deck sealants and stains also come in a variety of tints that will influence the appearance of the finished product.
Although it comes down to a matter of preference, clear or lighter sealants are generally best for traditional wood decks because they allow the natural wood grain to show. Lighter stains also do better in sunlight compared to darker stains because they don’t absorb as much heat.
Always read the instructions on your deck sealant. If you’re still having trouble deciding on the right sealant, don’t hesitate to ask a decking professional for a recommendation based on your decking material.
6. Apply Your Sealant
After you’ve checked the forecast to avoid rain, it’s time to seal your backyard deck. Start by applying painter’s tape to the siding and any other spots that need protection.
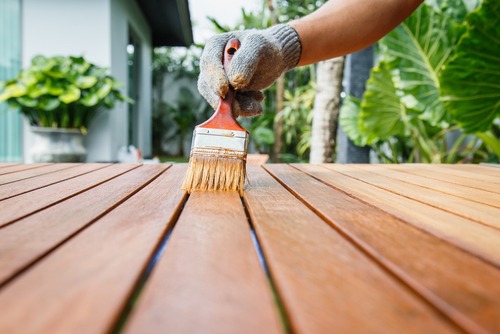
Apply your waterproof deck sealant using a paint brush or a garden sprayer, making sure to wipe up any drips as you go. Although the garden sprayer is faster, the overspray can be a disaster. Using a brush is preferable because it allows you to go slowly, board by board, for the best results.
Allow the sealant to dry completely and apply a second coat. Once the final coat is dry, you should have a beautifully sealed and protected deck that is ready for hosting the ultimate backyard bash.
Preserve Your Deck’s Beauty with Waterproof Sealing
Over time, harsh weather and heavy foot traffic can make decks susceptible to damage and stains. To keep your backyard deck in excellent condition, apply a waterproof sealant every year or as needed.
Don’t forget to maintain your deck in between sealings by cleaning off any dirt and grime. Keeping your deck dry and clean throughout the year will go a long way toward preserving its beauty.
 (No Ratings Yet)