How to Measure Wood Moisture Content in Flooring
Wood flooring can add a beautiful touch to any home and turn a commercial space into a masterpiece. Unlike some flooring materials though, wood is highly-susceptible to the environment it is in. That can lead to excess moisture in wood that makes installation and longevity of the floor a potential problem.
While trees do perfectly fine out in the wild when they get wet, your wood flooring material doesn’t fare so well when the moisture content is off. Use this guide to learn more about why wood moisture content matters during a building or renovation project. You’ll also learn how to properly check that the wood you’re using is in the right range for installation.
What Does Wood Moisture Content Mean?
Moisture content, in the simplest terms, is the amount of water that a piece of wood flooring material contains. For example, when a freshly sawn piece of wood is weighed, it may come in at 40-pounds. During the drying process, that piece of wood could easily lose 60% of its weight.
Of course, there is still moisture in any piece of wood that you intend to put down on the floor. In fact, even wood that is properly installed will vary in terms of moisture content with the weather, seasons and general indoor conditions. Since wood is porous, this is natural, and as long as the wood stays in a healthy moisture range, your wood planks and boards won’t look any worse because of these minor fluctuations.
Why Is it Important?
The concept of wood moisture content might not seem important to you if you’re buying wood flooring material to install in your home or commercial space. After all, that wood has already been kiln-dried in most cases, right? Yes, but wood moisture content still matters.
If wood with the wrong moisture content is installed, your floors could warp, crack, cup or shrink over time. This can lead to a dramatic reduction in the life of your wood floors. It can also be a costly mistake that could require replacing portions or all of your wood floors way before their lifespan should be up.
How Can I Test for Wood Moisture Content?
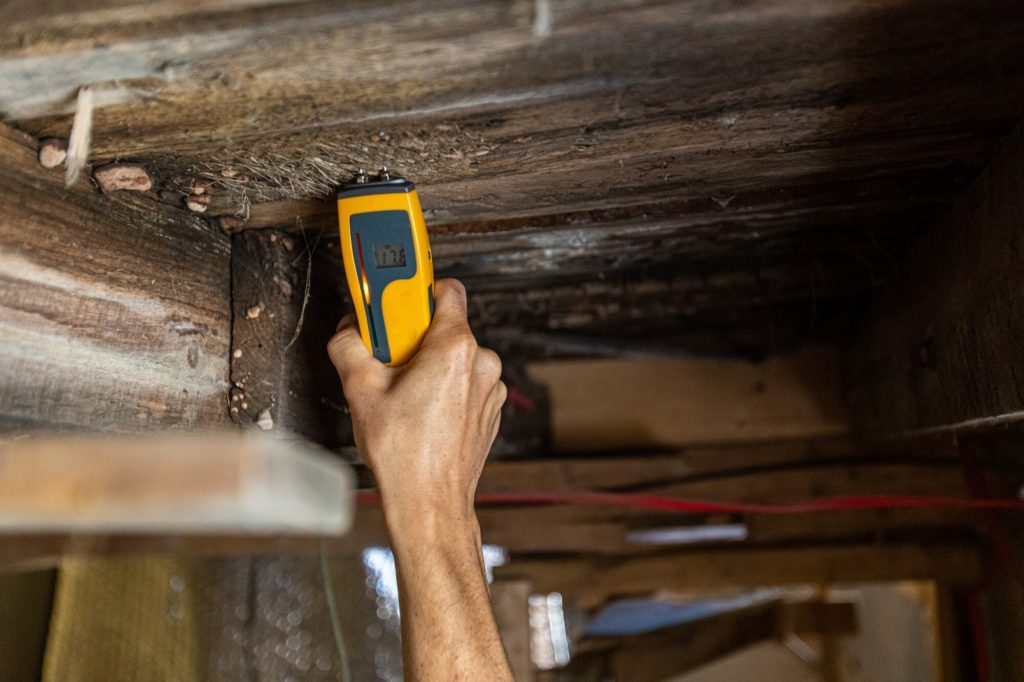
Simply inspecting a piece of wood or touching it with your bare hand won’t tell you much about the moisture content of that particular plank or board. To know the moisture content of your wood flooring material, you’ll need a special tool called a moisture meter.
For wood flooring, you’ll want to look for a moisture meter made specifically for wood use. A concrete moisture meter won’t give a proper reading that you can trust. Here are the two main types of wood moisture meters used for hardwood floor installation jobs.
Pin Moisture Meters
These moisture meters utilize two pin-like prongs and an electrical current to test the moisture content of your wood. These pins need to be hammered into the wood for a proper reading, so they can add unsightly blemishes to any wood that you are testing.
Pin-Less or Non-Destructive Moisture Meters
This meter type rests on top of your flooring material, using low frequency signals to test the moisture content through the depth of your wood. Since they don’t have pins that need to be hammered into the wood, they are often the most convenient choice for small jobs since you won’t need extra material for testing. Make sure the meter you choose is designed to test wood that matches the thickness of your flooring material. Otherwise you may get an inaccurate reading from the subfloor below.
How Do I Know What Moisture Content is Correct?
You’ve got your wood, your meter and you’re all ready to go, right? Here’s a quick guide to help you determine whether or not your wood is ready for installation based on the relative humidity of your region:
• 18-25% humidity: 5% wood moisture content
• 25-32% humidity: 6% wood moisture content
• 32-39% humidity: 7% wood moisture content
• 39-46% humidity: 8% wood moisture content
• 46-55% humidity: 9% wood moisture content
Except in the case of exterior wood installations, where moisture content levels of up to 14% are generally safe, using wood with more than 9% moisture is not advisable. Reducing indoor humidity to around 50% is preferable.
Installation Tips for Proper Wood Moisture Content
Wet wood can wreak havoc on your flooring installation project and lead to floors that are warped, cracked or otherwise damaged. Here are a few tips to help you ensure that your installation project doesn’t get off to a slippery start:
Let your wood acclimate to its new environment.
This is particularly important if your wood was shipped or delivered to your home from a different region or even out of state. The best way to do this is to unbox or unpack your wood flooring material and leave it in the room where it is to be installed for 48 to 72 hours. Leaving wood in a space on Friday afternoon for an installation that begins on Monday morning is a great way to get started.
Know your area.
To properly measure wood moisture content, you need to know the average relative humidity in your area. You’ll also need to know what is a generally acceptable range for indoor wood moisture readings.
Test multiple pieces of wood in different areas of the room.
Some installers recommend testing wood planks every 100 square feet of subfloor. Testing near walls and areas more prone to moisture is also a smart idea once you have your layout planned.
Test both sides of your board if using a pin-less meter.
This gives a more accurate reading if both sides are flat.
Ready to dig a little deeper and learn more about how moisture can impact wood flooring? Check out our blog post all about the ongoing battle between moisture and wood in commercial and residential spaces.
You can also reach out to our skilled, knowledgeable representatives to learn more about wood flooring. We can even help you better understand the process of getting your wood flooring material acclimated to a new environment to make installation as smooth as possible.