How to Install Hardwood Flooring

Choosing to install hardwood flooring yourself can save you a lot of money – if you know what you’re doing. Improper preparation and installation can lead to warping and buckling, which will ruin flooring that might otherwise remain beautiful and durable enough for your grandchildren’s grandchildren to grow up on. The most important thing you can do to ensure the structural integrity of your floor is to properly prepare.
Before You Install Hardwood Flooring Yourself
Choice of wood flooring is crucial. The factors that determine how and where hardwood flooring can be installed are:
Moisture – Consider the humidity levels in your area before deciding what kind of wood to choose. If you live in an area with high humidity or your land is at or below grade (sea level), engineered flooring may be a more appropriate choice than solid wood, or you may choose a wood with minimal response to moisture, such as teak.
Subfloor – Subfloors are generally wood or concrete, although some people choose to install over an existing floor; never install over carpet.
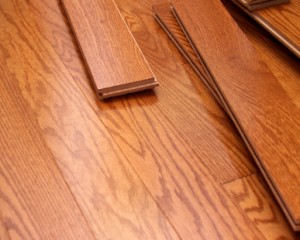
- Thick solid wood – 3/4″ profile – should only be installed over wood subfloors, above grade, and should be nailed.
- Thinner wood – 5/16″ profile – can be installed over wood, concrete, or over existing floors above grade using staples or glue.
- Standard engineered flooring can be installed over wood, concrete, or over existing floors using staples or glue. It can also be floated and glued down. Engineered woods can be used below, on, or above grade.
- Interlocking engineered flooring can be installed below, on or above grade, over wood, concrete, or over existing floors and installed by interlocking, no glue, staples, or nails required.
Difficulty – Level of installation difficulty should also influence your choice of wood flooring. Interlocking engineered wood is easiest to install and least likely to cause issues due to poor installation.
Standard engineered floors require glue or staples, and are a little more difficult to install due to the extra steps involved.
Thin veneers cannot be sanded, so the lifespan of a typical engineered floor is limited in comparison to solid wood, about 30 years maximum. Thicker, high-end veneers can be sanded up to 5 times over the life of the floor and will last for up to 60 years…and can easily cost more than solid wood.
Thinner solid woods with a 5/16″ profile are the next level of difficulty on the scale. Since planks can be glued or stapled, there is less chance of splintering on the edges, so it’s a little easier to install than thicker woods, but not as easy as an engineered wood. They can be sanded, and a lifespan of 50-75 years with proper care is not unreasonable.
Traditional solid woods with a 3/4” profile are more difficult to install. Planks must be nailed down with care taken to avoid splintering. This is your most durable investment flooring. Some solid wood floors installed a century or more ago are still in use – and still just as beautiful – today.
Potential Installation Pitfalls
One common thing people forget to consider is adjoining floors. Unless you’re doing a whole-house installation, at some point your wood floor will end and some other flooring, like carpeting in the bedroom or tile in the kitchen, will begin. Choosing a thin profile engineered or solid wood flooring can help minimize the difference. You can also choose transition trims to help equalize the different heights.
In new construction, installing over wet concrete is probably the most common mistake that people make, including professional installers. The slab must be given time to cure, and to dry completely after pressure washing. Your flooring will come with recommendations from the manufacturer about subfloor moisture emission level, usually about 4% maximum. Products are available to help speed the drying process, and if your concrete is at or near the maximum, we strongly recommend a moisture barrier beneath the floor.
Another common mistake is not leaving enough expansion room. Wood is a porous material that absorbs moisture from the air and swells in the summer, and then contracts in cold, dry air. It feels stable underfoot, but it’s really in constant motion. The manufacturer will have instructions about how much room is needed around the edges, and spacers are available in different sizes to ensure that it’s done properly.
Floor Preparation
An old adage in the business is, “Your floor is only as good as your subfloor,” and truer words were never written. Just as in business, construction, and relationships, you are unwise to build without a solid foundation. No matter how expensive the wood, a poor surface underneath will cause it to ring hollowly, squeak, warp, or buckle. The most important thing you can do to ensure the structural integrity of your floor is to start with a good subfloor. In simplest terms, the subfloor must be flat. You’ll hear the word level used a lot, but that’s misleading. The floor does not have to be perfectly level to install hardwood flooring, but it does have to be uniformly flat, without bumps, rough textures, dips, or divots.
Before you begin preparations, remove any furniture and appliances from the room. Everything that literally isn’t nailed down should be removed.
The first step in achieving a flat surface is to clean the subfloor thoroughly. Remove any paint, countersink nail or screw heads that are sticking up, remove clumps of drywall left over from wall installations, and clean up any other kind of dirt and debris. For plywood subfloors, make sure the seams where the plywood joins are flat, and check each section of floor for sagging or softness. Replace any sections that seem soggy.
Once the floor is clean, use a straight piece of lumber measuring 8-10 feet in length to find weak spots in the floor. Lay the plank out and look for gaps under it. Move it across the floor, marking the floor if there are any gaps; turn the board and move across in another direction, and then do the same diagonally.
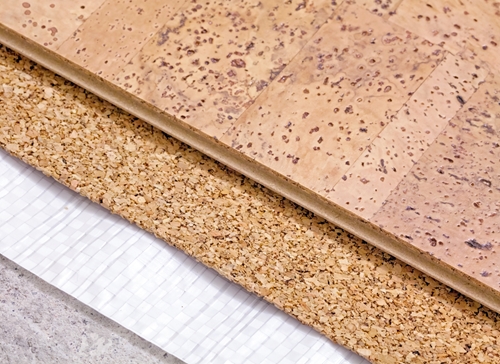
Note: Floating underlayment manufacturers often claim that using their product will correct minor irregularities in the subfloor. While this may be technically true for minute flaws, don’t assume it is the answer to your problem. If the underlayment does not rest on a flat subfloor, the same issues will eventually arise. So even if you’re floating the floor, make sure the underlayment is flat.
Installation
What You’ll Need:
- Pencil
- Safety glasses
- Moisture meter (wood, concrete or both)
- Transition trim and wall moldings as needed
- Hand saw, table saw, circular saw or band saw
- Underlayment with moisture barrier (optional, but recommended)
- Tape measure
- Carpenter square
- Hammer or rubber mallet
- Vinyl or plastic tapping block
- Pull-bar
- Utility knife
- Dust mask
- Tape
- Recommended wood glue
- Nails
- Stapler and staples
- Matching filler (if necessary to cover nails, screws or staples)
- Manufacturer recommended hardwood flooring cleaner
General Tips:
- Before the flooring is delivered, run the central air or heat for 14 days to establish the “normal” moisture content of the air and help dry any residual moisture.
- Have the flooring delivered a few days in advance and store it flat in the room where it will be installed. This will allow the wood to acclimatize to the humidity in the room.
- The beauty of your floor depends a great deal on shading and direction of grain. Before you install, lay out the floor to determine a pleasing pattern. Mark the position on the back of the boards (example: row 1, plank 1 or r1, p1).
- Examine each board for quality, color and flaws. You have the right to return inferior flooring before it is installed.
- Remove all existing molding, transition trim and, if possible, doorjambs.
- Do not tap the boards directly with a rubber mallet. This will mar the finish.
- You should never install hardwood flooring, or wood flooring of any kind, over radiant heating that can exceed a temperature of 85° F.
Recommended Reading
- Wood Sub-Floor Prep
- Concrete Sub-Floor Prep
- How to Install – Nail Down Hardwood Floors
- How to Install – Glue Down Hardwood Floors
- How to Install – Floating Glueless Click Hardwood Floors
- How to Install – Floating Glue- Seam Hardwood Floors
- Installing Moldings & Trim

Terry
my subfloor is 2×8 t&g. it has 3/8 particle board over it and carpet. I want to install engineered hardwood with staples. I know I have to remove the particle board. Can I staple the hardwood to the 2×8’s or do I need to cover the 2×8’s with 3/8″ plywood.
If I can staple to the 2×8’s does it matter whether I install in the same direction as the 2×8’s .
Gena
Can hardwood floors be installed over tile?
Rob Jones
Hi Gena and Connie,
Generally speaking, no. Most solid hardwood flooring needs to be nailed to a subfloor. Tile tends to make this difficult. Also, all subfloors need to be completely flat. So, even if you’re thinking of floating an engineered wood floor, the tile underneath has to be completely even. Hope this helps!
Hamid
What is the acceptable moisture content in engineer wood before installation
connie
Can hardwood floors be installed over tile?
Sarah P Holly
Can new hardwood floors be installed over existing hardwood floors, or does the old hardwood have to be removed first? Which type of wood floors would be best for such an installation? What type of underlayment would be best for this job?
Pete Derko
Anything I need to do special to install the new wider 3/4 planks they are now making. I always thought after about 3 1/4 wide they would warp and twist unless you screwed and pluged from the face. Can you install wide 5 and 6 inch planks just nailing the tongue? Thanks, I think they even have a 7 inch
Randy Spaulding
Hello. My installer did not allow the wood to acclimate and now we are getting large gaps in our solid oak hardwood flooring. ( 2 1/4 x 3/4 ) Is there a way to fix this without completely removing the floor and starting it over correctly.
Thanks, Randy
Wilda
Besides, these speakers occupy less than one square foot of space.
Although you might have some great space left over after shelving all your books to
include various other stackable and shelved items such as parlor game, folders, documents, DVDs, CDs, or photo cds; at first,
do not also consider shelving these type of items together with your
routine publications. Suppose you could possibly locate Included Bookcase Plans
and make storage place in an unused corner of the house.
petra collins
hello
my hubby ha m/s we have carpet all through the house I want hard wood floor now the wood that is already on the floor is good…my hubby walks a little but the carpet makes him fall..so my question is do u install also? could u please contact me …freedavid1230@gmailcom…or call me 267 319 1500..with a price for the whole house..5 rooms plus steps
Warmly, Petra collins
Earl. Batson
Hardwood is grown in USA, Canada and south americaIs any wood better than the other ?Quebec made Mercier red Oak versus other area Red Oak.Is here a real difference or is it personal preference?
Brenda Stevens
Hi…do you carry a floating engineered flooring, that does not require gluing or nailing..?
Kate
Installation of our new 3/4″ oak hardwood will require removal of existing oak parquet which was glued to floor 20 years ago. Any suggestions as to how that can be best removed?
Pingback: Hardwood Flooring Learning Center
Pingback: Frequently asked questions about hardwood (F.A.Qs) | exquisiteflooring